
olf balls may seem simple, but visually translating their unique dimples and glossy sheen through illustration is trickier than it looks.
By methodically tracing properly proportioned circles, strategically shading tones and judiciously lifting graphite highlights, sketching a realistic golf ball is very achievable for even a beginning artist.
Let’s step through the key phases of crafting this iconic spherical form from the ground up. With a little guided effort, you’ll be rendering your own sports equipment still life scenes in no time.
Gather Your Materials

When beginning any drawing project, it is important to first gather the required materials. To draw a golf ball, you will need a few basic drawing supplies that can likely be found around the house.
These essential items include a sheet of white paper, a standard number two pencil, a good pencil eraser, and optionally, a drawing compass for perfect circles.
Select a blank sheet of white printer or drawing paper in the size of your choosing. While dimension is personal preference, standard eight and a half by eleven inch copy paper provides ample room.
Also make sure your paper surface is smooth, not textured or lined. For graphite pencil drawings, the texture beneath can often overpower the image.
A standard number two pencil is preferred for the rich blacks and smooth coverage it can provide. While other graphite pencils will certainly work, a number two balances darkness and precision nicely for this project.
Sharpen your pencil well using either a straight blade or electric sharpener before beginning.
A good eraser is essential for removing incorrect lines and reworking areas that need adjustment. Both white plastic erasers and pink rubber erasers can effectively erase pencil without damaging paper.
Have your eraser on hand, sharpened and ready for use.
While completely optional, a drawing compass with pencil attachment can come in handy for expertly sketching the spheres and curves of a golf ball outline.
This tool removes much of the difficulty of drawing smooth circles freehand. But the project can certainly be completed using just the other supplies listed.
So to summarize, be certain you have gathered a sheet of smooth, white paper, a well-sharpened number two pencil, a pencil eraser, and if accessible, a drawing compass before moving forward.
These basic materials will form the foundation for executing your golf ball artwork.
Start with a Circle
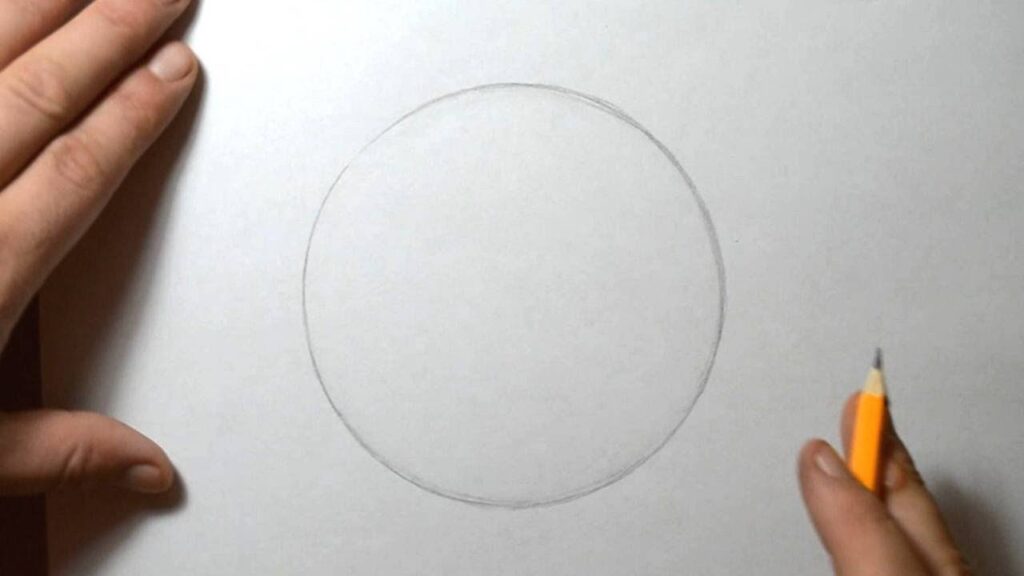
With gathered supplies in place, you can begin structuring the foundational shape of your golf ball drawing – the circle. Rest your paper on a flat working surface with ample room to move your entire arm.
If right handed, position the sheet angled slightly clockwise. Gripping your sharpened pencil near the bottom, lightly sketch a sizeable circle near the center of the paper.
Apply minimal pressure so the circular line is faint. Bearing down heavily runs risk of creating deeps groves difficult to correct.
The circle perimeter should be drawn large enough to allow detailing additional shapes inside its circumference. A good general guideline is making the empty space interior to your penciled circle about one and a half times the area of circle itself.
This gives suitable real estate for adding dimensionality. If using the drawing compass, carefully position and lock the needle tip where you want circle’s center point to be on the paper.
Adjust the hinged arm so that when the pencil point comes around, the full diameter leaves room for interior elements.
At this early stage, visually confirming the circularity of your initial outline is advised before putting pencil back to paper. Subtly uneven areas can be gently corrected using the edge of a soft eraser.
Take a moment to check proportions and make adjustments using an eraser before moving forward. With an appropriately sized and shaped foundation circle now faintly mapped in place, adding key interior elements is next.
Add Dimension

With the golf ball’s exterior sphere now sketched out, the drawing can be enhanced with shading and defining lines. But first, a secondary interior circle should be added within the initial outline.
This inner sphere gives depth and dimension, separating the main body of the golf ball from its solid core center.
Loosely eyeballing placement, sketch a second circle inside the existing outline, creating a visible space between. There is no need to meticulously measure equal distance around.
In fact, doing so could make things appear too perfect. Visually divide the outlined area into thirds, using the center and two equally spaced points along perimeter as guides.
Lightly draw the smaller interior circle to align roughly with these dividing points.
Correct size for the secondary circle is around two thirds the diameter of outer sphere. But this proportion can be adjusted some either way.
Keep the pressure light, as this interior outline will mainly serve as a centroid area from which to angle your shading strokes later on. Both initially mapped circles should remain very faint at this stage.
With the two foundational spheres now lightly defined, detailing with darker lines and value changes comes next.
Indicate Dimples
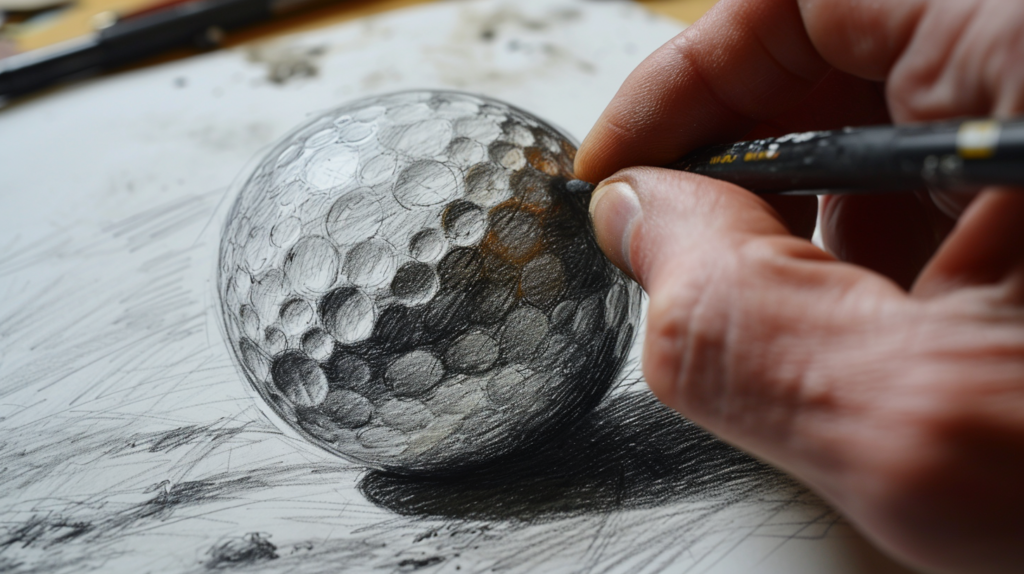
Before applying darker defining lines and shading though, lightly penciling a random pattern of dimples across the surface area is wise. Golf balls have evenly dispersed indentations all over their exterior.
Adding these early creates a template to shade around later.
Begin dappling uneven dots to represent dimples, keeping them small and fairly close together. Disperse them without obvious pattern across the entire surface bounded by the faint exterior circle.
Vary both size and proximity slightly for natural irregularity. The dimples can be darker than the outline circles without issue when shading subsequent layers.
Try to visualize an actual golf ball and recreate the quantity and distribution you are familiar with seeing. The dots should never touch or run together, but have a relatively consistent frequency.
Too few makes obvious gaps at this scale. When spaced evenly without order over all of the outlined spherical area, lightly sketch one to two hundred dots for best effect.
This irregular dimpling provides an underlying structure the pencil can skip over and accentuate when adding tonal shading later. With the dimple template established, defining visible edges comes next.
Refine Your Drawing
Before making visible edges too dark and prominent, it is wise to ensure the foundational shapes appear correctly proportioned. So reexamining the sketch for any obvious proportional flaws and making subtle adjustments at this stage is recommended.
Carefully look over the two connected spheres, correcting any spot that seems undersized or oversized. Smooth out any overt bulges or flat spots along the circles’ circumferences. Ensure the interior circle is round, not oval in shape.
Its position well centered inside the exterior outline likely needs slight nudging one way or another. Make any refinements to both circles using the side edge of a soft eraser.
With the golf ball’s underlying framework of shapes refined, begin slowly darkening key contour lines of the exterior sphere. Apply more pressure to deepen the side profile curvature and establish definite rounded edges.
Leave the interior circle faint while carefully retracing the outer shape. Watch for unevenness, stopping to rework any distorted sections.
Gradually build up tone over the entire outer arc until a clear, dark spherical outline results. Erase and redo any bits that waiver off circular or bulge unnaturally. Work slowly and methodically for best outcomes.
With clean, bold edges finally in place around the golf ball’s visible exterior slope, shading can commence.
Add Shading

Shading the drawing is pivotal in making the golf ball sculpture convincingly realistic. Precise blending of light and shadows suggests tangible roundness and mass.
Addition of tone requires thoughtfulness and patience for gradients that appear natural.
As a spherical object, brighter highlights logically occur nearer the golf ball’s upper vertical axis. Maximum darkness concentrates closer to its nether regions.
So initially deepening tone along the lower curve makes sense. Slowly drag pencil lead laterally, letting growing shadow intensity gradually fill upwards.
Varyingly lighten stroke pressure nearing the topmost area to better match a real illuminated sphere.
Shade more heavily inside sketched dimples, allowing graphite to pool slightly. Dimples by nature have more extreme light variance.
They visually recede deeper into form. Integrate this shading into lower surrounding values for smooth cohesion.
Continually stand back evaluating if intensity flow looks realistic.
With general light to dark stratification established, further develop specific regions. The pencil’s sharp edge can chisel abrupt darkness along the lowermost contour.
Use broad side to softly smear large gradients surrounding each dimple above this intense basal band. Creating such diversity of mark and value integration makes things appear tactilely three dimensional.
Throughout the shading process, continuously scrutinize if distribution logically matches a spherical object illuminated from above. Step back and squint eyes often to better judge smoothness and continuity of the ever evolving values.
Make small refinements regularly as the image becomes more dimensionally nuanced.
Highlight the Surface
As shading progresses, thoughtfully conserve bare paper in key spots to later act as specular highlights. These critical lighter regions will eventually define the golf ball’s shiny reflective punctuation.
Planning for these elliptical brights early on makes evenly distributing them easier when significant tone already established.
With broad swaths of graphite now laid in place, strategicplucked lifts using the kneaded eraser help create highlighted punctuation. Careful subtractive erasing exposes glowing bands along the upper sphere contours.
Jagged lifts suggest bright irregular glints Generic smooth shapes could indicate something more flat and matte texture instead of a glossy rounded surface.
Further brighten key raised areas by honing to the edge of established dark values nearby. Sharp single edge highlights lend realism, so keep them narrow.
Broad diffuse gleams work better lowering on the sphere to describe reflected light bouncing up from the ground plane below. Use both selective erasing and targeted shading together for convincingly lifelike illumination.
Appraise frequently once entire golf ball covered in tone, making final refinements for even polish. Lightest regions should contrast well against neighboring darks.
Subtly smooth any abrupt value jumps that feel jarring. Signifying shine effectively takes understated control and restraint.
With tones now fully mapped from light to dark, the illustration convincingly rounds outward from the flat page. Precision shading transforms the preliminary structure into palpable volumetric form.
Carefully applied erasures expose raw paper that reads as bright reflective spots. The strategically highlighted monochromatic sphere appears like a real physical object hit by light from above.
Conclusion
If carefully followed, the createforsteps above should yield a recognizable pencil drawn golf ball. Mastering the ability to render dimensionally convincing imagery solely from graphite and paper takes much time and practice.
Do not worry about making a perfect end drawing on initial attempts. Focus instead on continually developing essential fundamental capabilities over progressively improving efforts.
This straightforward exercise teaches core artistic concepts like proportion, perspective, value mapping, edge control and mark making. Improving each aspect gradually through applied repetition over various subject matter allows skills to compound positively.
Sketching something simple like a golf ball forms key foundations for ultimately depicting more elaborate visual scenarios. Mastering essential methods achieves artistic excellency over time through patient, purposeful, and consistent hands-on craftsmanship.
So now possessing established techniques for making visually tangible spheres, try rendering additional basic geometric forms. Practice makes perfect.
Building competency illustrationg various subject matter gives invaluable confidence tackling future creative goals. Be diligent staying dedicated to routinely developing your drawing expertise.
Regular practical improvement advances ability faster than any passive learning.